
High-speed internet and advanced mobile devices have raised user expectations for quality video content. Platforms like YouTube, Netflix, and social media networks have become hugely popular…but delivering such content poses several challenges: bandwidth limitations, network congestion, device fragmentation, codec and format compatibility, storage and delivery costs, among others.
Video encoding is essential in bridging this gap, converting raw video data into a compressed, more compatible format using encoding algorithms and codecs.
But setting up proper video encoding infrastructure is easier said than done. There are significant costs – investing in powerful servers or dedicated hardware encoders, implementing specialized software solutions, and acquiring the necessary knowledge in video encoding techniques.
What if we could fix all these blockers within one common umbrella?
That solution is cloud video encoding – video encoding that uses cloud-based services that are comprised of specialized infrastructure and distributed processing.
Let’s examine this in detail.
Difference between encoding and transcoding
First of all, let’s clarify something: video encoding and transcoding are different processes that are applicable for different use cases, and are not identical terms that can be used interchangeably.
| Encoding | Transcoding | |
|---|---|---|
| Purpose | Encoding is primarily focused on compressing and optimizing raw video data from the source, to a standard, more compact format, while maintaining visual quality as much as possible. | Transcoding, on the other hand, is about taking an already encoded video, and changing it for easier storage or transmission. This can take the form of format conversion, or adjusting bitrate (transrating) or video frame (transsizing) to suit specific requirements. |
| Compression | Encoding always involves compression of raw video data to reduce file size while maintaining acceptable quality. Example: For editors, it’s common to use the Apple ProRes codec to convert RAW footage from cameras – which are very large files – to a much more compact representation in QuickTime format (MOV) that workstations won’t struggle with. | Transcoding may involve further compression (lossy compression), but this is not a certainty. Further compression can be used if the target format or device can only smoothly play a certain quality of video. Example: Converting an existing MP4 file (H.264 codec) in high definition (1080p), to a standard definition (480p) version, because the target device stutters with full HD playback. |
| Format Conversion | RAW video formats used in professional/high end cameras (Sony RAW, CinemaDNG etc.) are fundamentally different from those that can be played back on most user devices (MP4, WEBM, etc.) and so encoding necessarily involves a file format change. | Transcoding may involve a format conversion if compatibility is needed, but this is not a certainty. Format conversions can take place if the target device only supports a certain file format.Example: Converting an existing, encoded MKV file to the universal MP4 format using the VP9 video codec to ensure maximum web browser compatibility. |
| Use Cases | Encoding is typically performed once, at the initial stage, to create a compressed version of the raw/source video suitable for storage, post-production editing, or transmission and playback. | Transcoding is performed whenever an already-encoded video needs to be adapted for specific use cases, such as streaming, distribution, or compatibility with different devices or platforms. |
In general, encoding deals with the initial compression and conversion of a video from the source format to a compressed format, while transcoding involves converting an encoded video to a different format or adjusting its parameters for specific purposes. Encoding is usually performed once, while transcoding can be performed multiple times to adapt the video to different requirements.
The need for cloud video encoding
While video encoding on local workstations, using software like FFmpeg can be suitable for smaller-scale encoding tasks or specific use cases, leveraging cloud video encoding affords you several advantages such as:
- Varied video formats and codecs: Cloud encoding services usually support a comprehensive range of video formats and codecs, and most importantly, they stay updated with emerging formats and standards, always ensuring the broadest compatibility across different devices, browsers, and operating systems. If you wanted to do this locally, the responsibility of constantly updating to (and maintaining) the most cutting-edge software, libraries, frameworks, and the hardware necessary to support them would rest squarely on you.
- Real-time Video Streaming: If you need to stream videos with low latency, encoding videos in real-time or near real-time is critical so that you can have seamless live events, webinars, or interactive video experiences.
Doing it locally simply won’t cut it, the latency would be too high. Cloud encoding services leverage powerful and distributed computing resources specifically optimized for video processing. They offer robust encoding infrastructure with high-performance hardware and networks that can take you from recording to delivery in seconds, and this infrastructure is maintained and managed by the service provider, eliminating the need for you to invest in and maintain your own hardware.
- Video Streaming at Scale: Streaming for large concurrent audiences, in high-traffic scenarios is an area where latency can take a backseat, but reliability is king, and no disruptions in service can be tolerated.
Cloud video encoding once again has the advantage over local methods here, as it can dynamically allocate computing resources based on demand, as well as distribute load across multiple servers with parallel processing and multi-instance encoding capabilities to process multiple video files simultaneously.
- Need to Ensure All-Device Compatibility: With so many devices and platforms around, ensuring video compatibility across everything becomes crucial. Cloud video encoding services provide predefined encoding presets and profiles optimized for playback, streaming, or any other purpose. These presets and profiles include the necessary video settings – bitrate, resolution, codec, and container format – to ensure an optimal experience.
- Adaptive Video Playback: Cloud video encoding services provide Adaptive Bitrate Streaming (ABR) out-of-the-box, which is crucial for delivering video at scale. Adaptive bitrate streaming adjusts the video quality in real time based on the viewer’s network conditions, ensuring a smooth playback experience. Cloud encoding platforms generate multiple versions of the video at different quality levels, allowing the streaming service to switch between different bitrates seamlessly as network conditions change.
Implementing ABR with local encoding pipelines is incredibly complex, but ignoring adaptive video playback can (and frequently does, at scale) result in poor streaming performance, buffering interruptions, and a suboptimal viewing experience.
- Optimize delivery: Buffering is a common frustration for viewers when streaming videos. Cloud video encoding platforms often integrate with content delivery networks (CDNs), which distribute video content to viewers by caching and delivering the encoded video files from edge servers located closer to the viewers. Integration with CDNs ensures efficient content delivery, reduces latency, and improves streaming performance, even when serving a geographically dispersed audience.
In summary, cloud video encoding is crucial for real-time video streaming as it enables pipelines that don’t need you to spend a fortune on supporting and maintaining in-house, and is scalable, optimized, adaptive streaming supported, and integrated with CDNs.
How to set up cloud video encoding
Let’s look at how you could set up such a cloud video encoding service. We’ll use ImageKit as an example.
ImageKit is a cloud-based video encoding, optimization, transformation, and Digital Asset Management platform that streamlines storage, video encoding, and video optimization for you, at scale, with a URL-based workflow – with added webhook support to enhance the developer experience for asynchronous transformations.
Here’s how you would use it :
Step 1: Add your video files to ImageKit
You have two options for uploading your videos for ImageKit.
- Upload your file to ImageKIt’s Media Library: ImageKit offers a highly-available cloud storage solution of its own, built on top of AWS S3, with an intuitive interface that lets you upload, search, and tag video files for cataloging.
- Or, connect your existing cloud storage: Imagekit provides integrations with many cloud storage platforms such as AWS S3 and S3-compatible storages (like DigitalOcean Spaces, Google Cloud Storage), Web servers (Magento, AWS EC2), Cloudinary buckets, and more. You only need to provide the required permissions and credentials (or Web Proxy origin, if using a public image URL) and ImageKit will have access to your video files.
Step 2: Enable automatic conversion and optimization
ImageKit can automatically convert video formats and optimize video quality on delivery, based on factors like device capabilities, browser support, cross-platform delivery, dynamic image conversion, cache management, etc. For this, no additional effort is needed on your part, all you need to do is turn on Automatic Format Conversion and Automatic Quality Optimization from the ImageKit dashboard.
For automatic video format conversion:
- Log in to ImageKit, and go to your Dashboard.
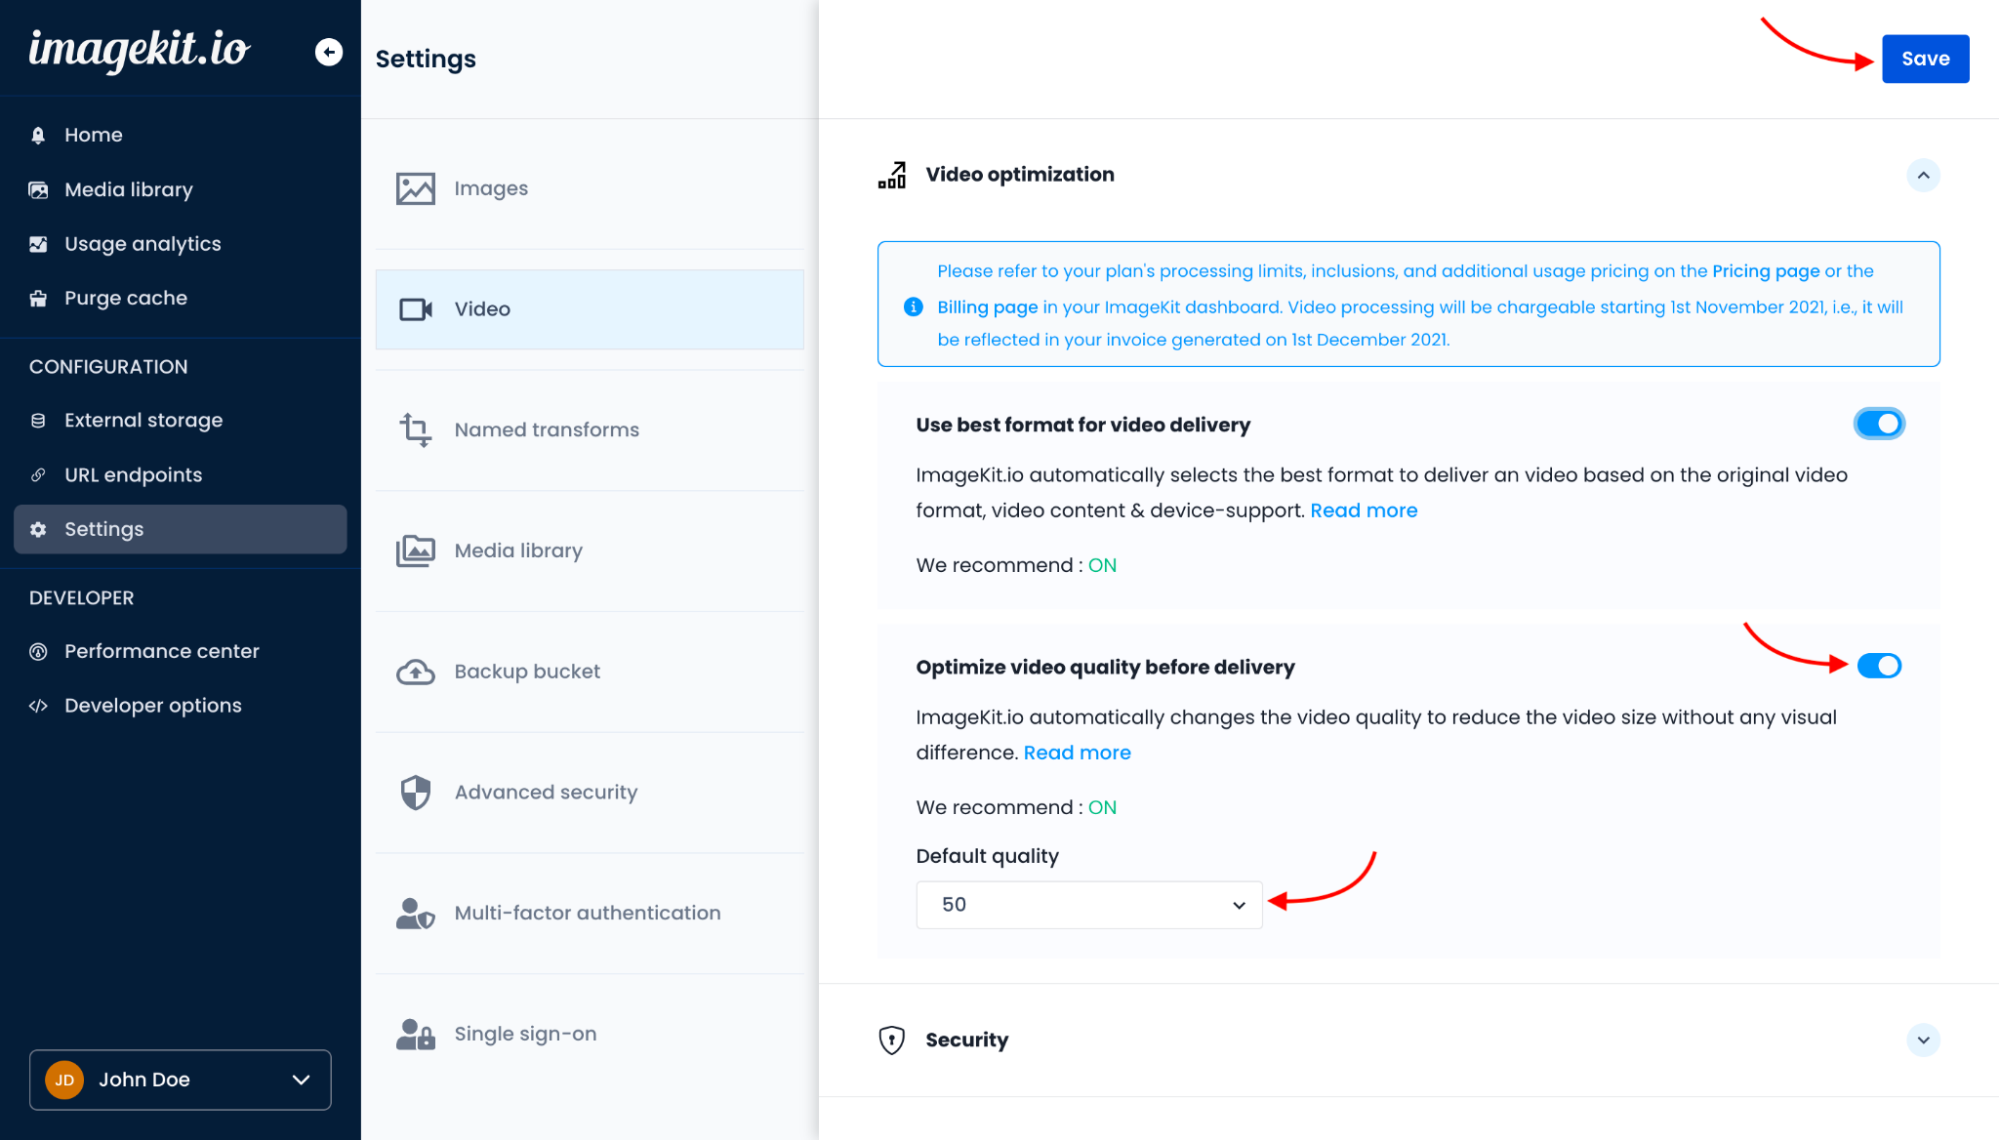
- Under the Video Settings tab, set “Use best format for video delivery” to on.
For automatic quality optimization:
- In your ImageKit dashboard, inside Videos, and under optimization, set “optimize video quality” control to on.
- By default, ImageKit sets the video quality to 50. This will give you a balanced, good enough for all use cases visual quality, but can be changed to whatever suits your use case. Keep in mind that a very high value (90-100) will not improve quality beyond the source.
With these, you’ll always deliver videos in the best-fit format for all of your users’ devices/platforms and never have to worry about perceptual visual quality vs. file size.
Step 3: Use the URL you get from ImageKit
You can now embed this video URL anywhere you need, without worrying about compatibility, or performance. This video will be automatically delivered from a location nearest to your end user, thanks to ImageKit’s CloudFront CDN integration.
Step 4: Video Transformations
If you need to adjust resolutions, trim or crop the video, or add text overlays/watermarks, you can do so in real time using the URL-based ImageKit transformations API. It also enables audio extraction and thumbnail generation.
Here’s an example. The HTML5
https://ik.imagekit.io/your-account/your-video.mp4/ik-thumbnail.jpg
That’s it. All you have to do is append /ik-thumbnail.jpg to the end of the URL to a video you have stored on ImageKit, and you’ll get back a JPG of the first frame of the video, and you could use it as your
But wait, there’s more. What if you knew the exact dimensions of the layout you were using and wanted a resized thumbnail to begin with, saving bandwidth? You can do that too, combining thumbnail generation with ImageKit’s resize transform, like so:
https://ik.imagekit.io/demo/sample-video.mp4/ik-thumbnail.jpg?tr=w-480
This will get you the same thumbnail, but resized to a width of 480px, saving bandwidth.
Step 5: Bringing it all together
Here’s what you have accomplished so far with ImageKit:
- Uploaded your video to ImageKit’s cloud storage – the Media Library
- Set it up to be automatically optimized in terms of quality, based on the requesting user’s network capabilities/bandwidth
- Automatically converted it to the most optimal format, based on the requesting user’s device
- Generated a thumbnail image on the fly from it, using ImageKit’s URL-based transformation API.
Now, to bring it all together and render it using HTML5, embedding it directly in your webpage:
This is how simple working with web video is when you use ImageKit as your cloud encoding solution.
Bonus: Adaptive Bitrate Streaming
Now, if you want Adaptive Bitrate Streaming (ABR) for your videos, which optimizes playback quality based on the viewer's internet connection, you only have to append /ik-master.m3u8?tr=sr-480_720_1080 to the end of a video URL for HLS, or /ik-master.mpd?tr=sr-480_720_1080 for MPEG-DASH. This will get you 480p, 720p, and 1080p representations of the source video, ready for ABR streaming.
If you want other representations, see here to know how your transformation needs to change. Separate the representations/variants you want with an underscore for this URL transformation, and ImageKit will generate them along with a ready-to-embed ABR manifest for you, in near real-time.
Your video’s URL should now look something like:
https://ik.imagekit.io/your-account/your-video.mp4/ik-master.m3u8?tr=sr-480_720_1080
This URL can now be embedded using an HTML5-based Video player that supports Adaptive Bitrate Streaming, like Video.js or JW Player.
Webhooks for your cloud encoding pipeline
ImageKit makes cloud video encoding simple for both one-off uses, as well as batched pipelines if you were doing encoding at scale.
ImageKit makes cloud video encoding simple with a URL-based API that is near real-time, and covers most common encoding requirements.
But, if you have long form video content or a large number of videos, and need to programmatically automate your pipeline, you will want a way for your apps to be notified asynchronously when an encoding has finished processing.
Let’s look at why, and how, you might want this feature.
The scenario: You need to create a thumbnail image for a large video, at a given timestamp. So, you assign the poster attribute within a tag to reference a resource in a CMS. While the thumbnail is being processed by ImageKit, the CMS value only serves as a temporary placeholder. It's only when the thumbnail generation is complete that you want to update the corresponding value in the CMS, which will then be reflected in the actual tag.
Here’s the problem: How do you automatically update the value in the CMS, without constantly polling for it and clogging up your network?
The solution: ImageKit’s Webhooks. With them, you can receive real-time notifications about video processing events (for our example, when the thumbnail generation option is complete) and then use it to trigger custom actions or integrate with other services in your development pipeline (updating the value in the CMS).
Let’s look at how you can set up such a Webhook-based workflow with ImageKit and Express.js.
Step 1: Configure a Webhook in your ImageKit dashboard
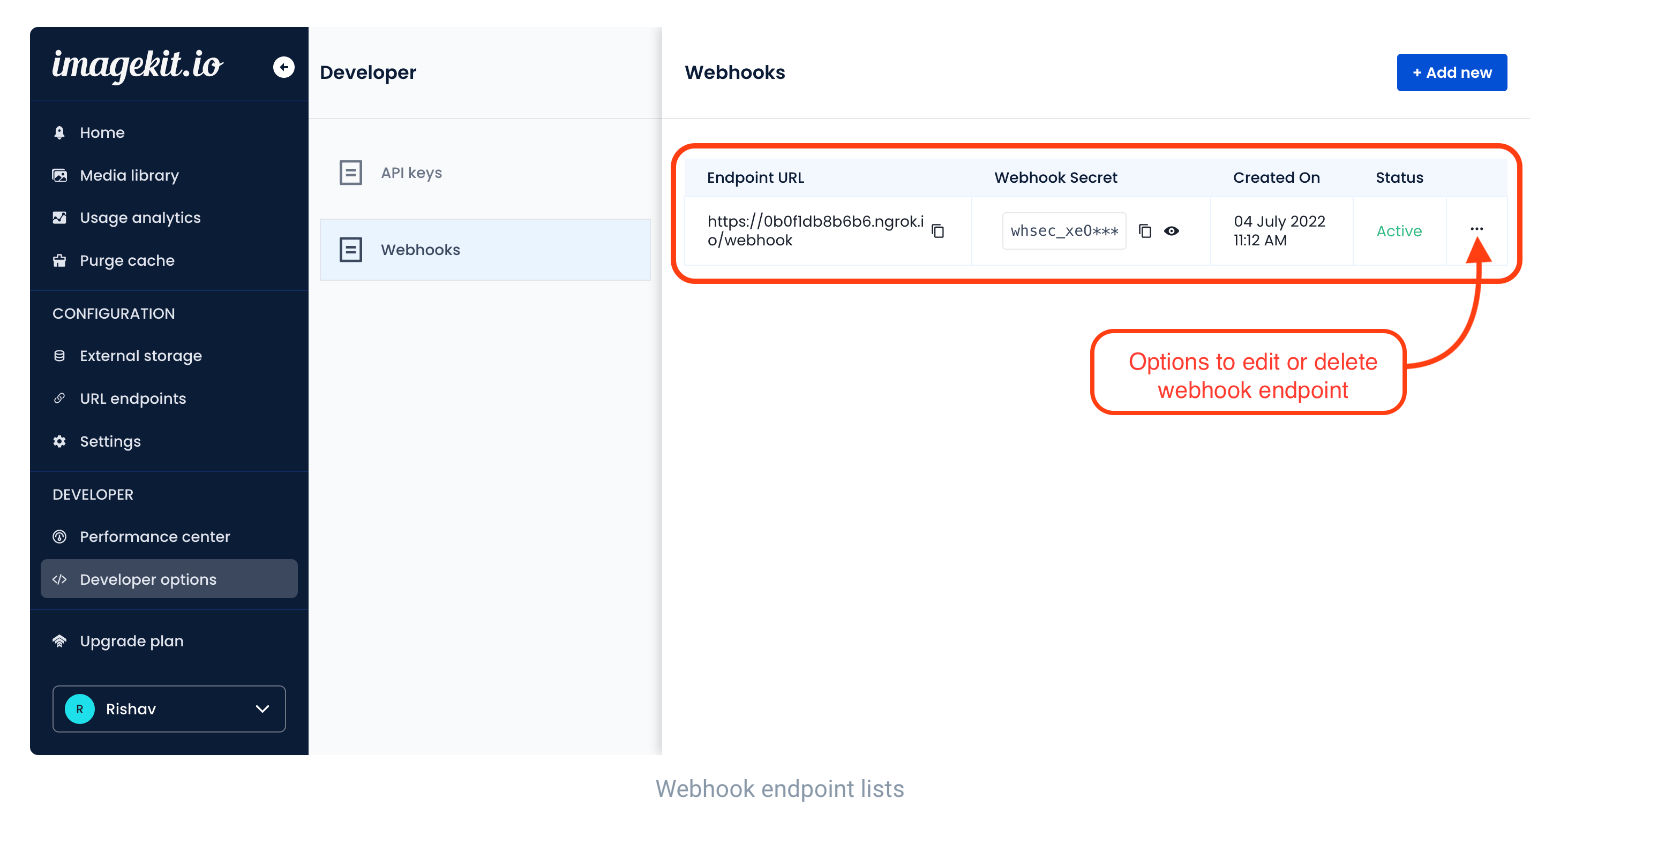
Go to developer options in the ImageKit dashboard. Under Webhooks, you will see the list of webhook endpoints configured.
Click on the "Add new" button to create a new webhook endpoint, then enter a valid HTTPS URL for it, and you’ll see it added to the list, with its Secret. Copy this down, as we’ll need to use it in our Express server code to actually handle the webhook.
Step 2: In your Express.js server, verify and handle the Webhook.
Make sure you have the ImageKit NodeJS SDK installed for this.
Once that’s done, here’s the NodeJS pseudocode for verifying and handling the Webhook. For a more detailed implementation, check here for ImageKit’s documentation on the topic.
// Step 1 : Imports (Express and ImageKit) */
// Step 2 : Config
  // Paste the Webhook SECRET you copied from ImageKit dashboard
  const WEBHOOK_SECRET = 'whsec_...';
  // Instantiate ImageKit with your ImageKit public/private keys
  const imagekit = new Imagekit({
    publicKey: 'YOUR_IMAGEKIT_PUBLIC_KEY',
    urlEndpoint: 'https://ik.imagekit.io/your_imagekit_id',
    privateKey: 'YOUR_IMAGEKIT_PRIVATE_KEY',
  });

// Step 3 : Define a ExpressJS route for the webhook
app.post('/webhook',... (req, res) => {
  try {
   // Step 4 : Use ImageKit to verify webhook signature from req headers here, this returns an `event` object
 const { event } = imagekit.verifyWebhookEvent(body, signature, WEBHOOK_SECRET);
   // Step 5 : Handle Webhook
    switch (event.type) {
      case 'video.transformation.ready':
        // Transformation complete, update CMS resource URL with the thumbnail
        break;
      case 'video.transformation.error':
        // Encoding error. Log it.
        break;
      default:
        console.log(`Unhandled event type ${event.type}`);
    }
    res.status(200).end();
  } catch (e) {
    // Return HTTP 401 if any error
    return res.status(401).send(`Webhook error: ${e.message}`);
  }
});

// Step 6 : Set up ExpressJS app to listen on a port of choice. Replacing `localhost` with your actual host when in production
Step 3: Frontend code
And of course, you’d have a tag in your frontend which points to the placeholder CMS resource, that will be updated on the next refresh when the value changes in your backend, handled by the ExpressJS code.
Conclusion
Video encoding is crucial for delivering rich video content on the web, but it’s not very accessible. Cloud video encoding services like ImageKit help, by offloading the actual encoding task to remote servers and performing them in the cloud on distributed, parallel architectures, eliminating the need for local hardware or software dependencies, or expertise.
As a video optimization and transformation tool, ImageKit provides a comprehensive set of features for real-time video encoding, optimization, and transformation.
When it comes to video streaming, it eliminates traditional performance bottlenecks in terms of latency, content delivery, and scalability regardless of the size or volume of your video content. The Webhook-based workflow it provides, along with the ImageKit SDK, allows for automated, batched, programmatic handling of video processing tasks with enhanced developer experience
ImageKit's robust feature set, scalability, and developer experience make it a strong contender for fulfilling your cloud video streaming requirements.
Want to know about the full capabilities of ImageKit?
Sign up for a free trial. It comes with free 20 GB storage for videos and images.
https://imagekit.io/blog/cloud-video-encoding/


 Teams Up with Vodafone to Ease Mobile Network Congestion with Video Optimization")